  • Trainings & Workshops
    • Teacher Training Overview
    • 200-Hour Training
    • +300/500-Hour Training
    • Fees & Registration
    • Apply Online
    • Frequently Asked Questions
    • Recent Graduates Reviews
    • Upcoming Workshops
    • Workshop Topics
    • Booking Mark
  • Online Resources
    • Online Resources
    • Instructional Videos
    • Audio Podcasts
    • Readings
    • Visual Slideshows
  • Books
    • Teaching Yoga
    • Yoga Sequencing
    • Yoga Adjustments
    • Yoga Therapy
    • Yoga for Better Sleep
  • Musings
  • Classes
  • About
    • Mark's Books
    • About Mark
    • Contact
    • Santa Cruz
< Back to slideshow resources

Surya Namaskara B (Sun Salutation B)

Tweet


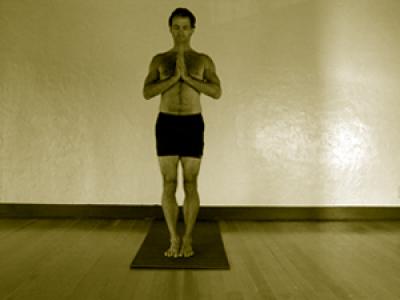
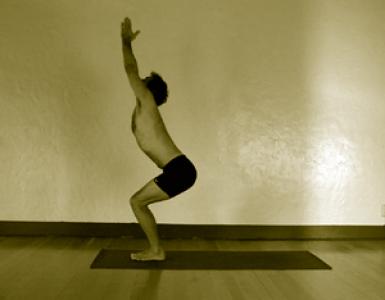
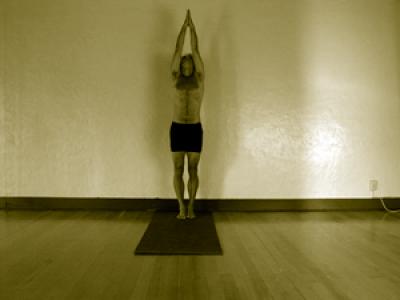
  • The initiating inhale brings you into Utkatansana from Tadasama (I like to move from Anjali Mudra – palms together at the heart). Consider the option of gazing down or toward the horizon rather than up as a way to reduce potential strain in the neck in this movement.
  • New students who are unstable in Tadasana or have very tight hips can practice this movement into Utkatasana with the feet and knees hip distance apart.
  • Students with tight shoulders: keep your arms parallel rather than drawing your palms together overhead in Utkatasana.
  • In practicing the first Utkatasana, place your hands into the creases of the groins and push the femoral heads toward the heels while extending long through the spine while trying to find a sense of pelvic neutrality relative to the spine
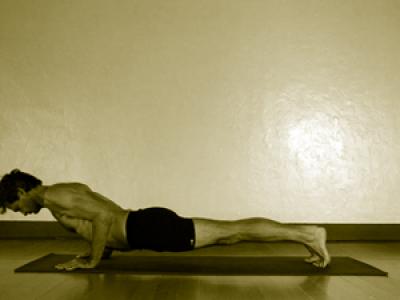
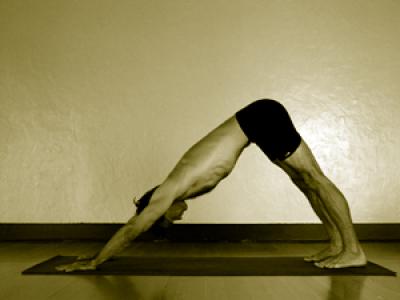
  • In transitioning from Adho Mukha Svanasana to Virabhadrasana I, consider first instructing Plank Pose as a way of introducing high lunge poses and offering a space in which to gently awaken the hip flexors and groin while ensuring that students understand the very important alignment principle of knee-over-heel.
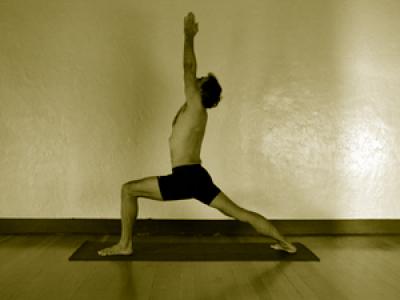
  • In the first Virabhadrasana I, straighten your front leg, place your hands on your hips, and feel the internal rotation of the back leg as coming from your back foot. • Explore the movement of squaring the hips toward the front and resisting the anterior tilting of the pelvis when bending the front leg into the asana.
  • In extending the arms overhead in Virabhadrasana I, soften your floating ribs in as a way to help develop greater shoulder flexion and prevent compression in the low back.
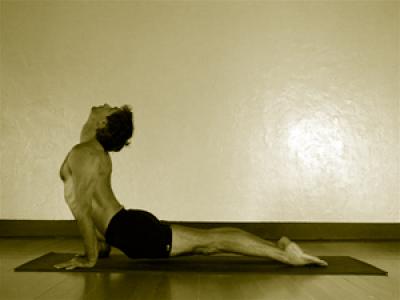
  • In the transition from Virabhadrasana I to Chataranga Dandasana, keep the movement simple, fluid and connected to your breath. You will observe many students, especially beginning students who have been seduced by “power yoga” techniques, keeping one foot off the floor all the way into and even through Chataranga Dandasana. This compromises the stable foundation of Chataranga Dandasana; done repetitively, it will destabilize the sacro-iliac joint and lead to potentially chronic problems in the low back. Remember: Chataranga is an asana
< Back to slideshow resources
Previous Pause Next
1. Tadasana (Mountain Pose)


  • Standing with your feet together at the front of your mat, lift and spread your toes while rooting firmly into the inner edges of the balls of your feet, feeling with this action the balanced lifting of your inner arches, or “Pada Bandha.”
  • Maintaining Pada Bandha while firmly rooting your feet in the Earth, feel the rebounding effect of the musculauture in your legs gathering in and up.
  • Firming your thighs and lightly spiraling your inner upper thighs back, explore placing your hands on the top of your hips to find a feeling of pelvic neutrality – hips level, spine growing naturally out of your pelvis.
  • Breathing smoothly and steadily, with each inhale keep rooting your feet and engaging your thigh muscles while growing taller through your spine, expanding across your heart center and extending energetically out the crown of your head.
  • With relaxed engagement, try to maintain that extension and spaciousness as you slowly exhale, feeling a sense of renewed stability and ease as your breath flows out.
2. Squat
3. Uttanasana (Standing Forward Bend)


  • rom Urdhva Hastasana, exhaling slowing swan dive forward and down with a long spine and flat back, extending from your public bone through your sternum while your legs either straight and strong or bent to relieve strain on your hamstrings and low back.
  • Try to maintain “Tadasana legs” throughout this movement.
  • When doing this asana as part of a Sun Salutation, complete your exhale in Uttanasana and begin the next movement on your inhale.
4. Ardha Uttanasana (Forward Bend)


  • From Uttanasana,   inhaling extend your chest forward toward the horizon, maximizing the length of your spine and sense of extending your heart center toward the horizon.
  • It’s okay to keep your knees bent while working toward keeping your legs straight and strong.
  • You can also place your hands on your shins or come high onto your fingertips as in the picture while working toward maximum extension with your palms still rooted onto the floor as in Uttanasana.
5. Chaturanga Dandasana (Four-Limbed Staff Pose)


  • In first learning this pose, start in Phalakasana and with an exhale slowing bend your elbows to lower down while trying to keep your elbows tracking directly behind your shoulders (resist the tendency for your shoulders to splay out or squeeze in)
  • Consider lowering with your knees on the floor as you develop the strength in your arms, shoulders, upper back and core to lower with ease and stability.
  • Lower to where your shoulders are just level with your elbows, shoulder blades drawing down your back, over time wrists aligned under your elbows.
  • Keep your legs engaged, pelvis neutral, belly lightly engaged, sternum extending forward, back of your neck long.
6. Urdhva Mukha Svanasana (Upward-Facing Dog)


  • Urdhva Mukha Svanasana is an intense and powerful awakening backbending asana.
  • Always consider the option of Salabasana B or “Easy Cobra” as an alternative in the following conditions: low back pain or insufficient arm, shoulder or leg strength to suspend their body on the hands and feet.
  • Urdhva Mukha Svanasana is “set up” with proper alignment in Chataranga Dandasana.
  • In first learning the asana, it is helpful to first learn Salabasana and/or Bhujangasana.
  • Emphasize active legs. Along with alignment principles, this is the key to reducing the risk of low back strain on this asana.
  • Press the tops of your feet firmly down and create a sense of extending your toes straight back.
  • In rooting the feet down, the legs can become more active. Try to rotate your inner thighs up, thereby creating space in the SI joint and greater ease in drawing the tailbone toward the heels.
  • Most students tend to squeeze their buttocks in this pose, which has the effect of externally rotating the thighs and compressing the low back. Let go of your buttocks!
  • Rooting firmly into the knuckles of the index fingers helps to ensure balanced pressure across the hands and wrist joints, thereby reducing the likelihood of strain in the wrists. Strong and balanced rooting of the hands also leads to greater extension of the arms and lifting and spreading of the chest, which is essential in creating the length in the spine required for deepening the backbend.
  • Try to consciously draw the curve of the backbend up your spine and create a sense of pulling the lower tips of your shoulder blades down and forward as if into your heart center while spreading your collarbones.
  • Students with weak shoulders (specifically rhomboids, traps and serratus anterior muscles) will tend to hang in their shoulders, which tends to strain the neck, close the heart center, compromise the breath and exacerbate the tendency to dump into the low back. Encourage these students to more actively press into their hands (wrists allowing) in order to better activate the drawing of the shoulders down away from the ears, pulling their shoulder blades down and spreading their side ribs forward.
7. Adho Muckha Svanasana (Downward-Facing Dog)


  • Adho Mukha Svasanasa is a powerful, timeless teacher. It actively involves nearly every part of the body.
  • It stretches the fingers, wrists, arms, shoulders, back, side, chest, hips, legs, ankles and feet.
  • It strengthens most of the same parts of the body as well as the abdominals when one is cultivating ujjayi pranayama, mula bandha and uddiyana bandha.
  • Press firmly into the entire span of your hands and length of your fingers, paying close attention to rooting the knuckle of the index finger as a way of balancing pressure in the wrist joint.
  • Generally, the middle fingers should be parallel and in line with the shoulders. Look at see if your arms are parallel; this will indicate if your hands are in line with your shoulders.
  • The alignment of the wrists with the shoulders allows the proper external rotation of the shoulders.
  • Tight shoulders – especially limited shoulder flexion due to tight latisimus dorsi, pectoralis major and rhomboid muscles – and weak shoulders create specific risks to the neck, back, elbows, wrists and shoulders themselves. In either case, moderate effort in this asana develops both strength and flexibility, opening the shoulders to full flexion while developing deeper, more balanced strength.
  • The shoulder blades should be rooted again the back ribs while externally rotating the shoulder joint, spreading the trapezius.
  • Feet should be placed hip distance apart or wider with the outer edges of the feet parallel.
  • Students with tight hips and hamstrings will find it difficult, painful and/or impossible to straighten their legs in this asana. Explore separating the feet wider apart and keeping your knees bent while moving into deepening your flexibility.
  • Rooting into the balls of the feet will contribute to the lifting of the inner arches. This in turn helps to engage mula bandha (by activating the pereneus longus and tibialis posterior, which through fascial attachments help activates the hip adductors and pelvic floor muscles).
  • Firming the thighs and pressing the top of the femur bones strongly back is a key action (along with rooted hands) in lengthening the spine in this asana. Resist any tendency to hyperextend your knees.
  • With practice, the neck will become sufficiently strong and supple to keep the head between the upper arms. Until that strength and ease is developed, let your neck relax and head hang down.
  • The first few times in the asana in any given practice, it can feel good and help the body in gently opening to “bicycle” the legs, dipping alternately into each hip and stretching long through the sides of the body while exploring the hamstrings, low back, shoulders, ankles and feet.
8. Lunge Up
9. Chaturanga Dandasana (Four-Limbed Staff Pose)


  • In first learning this pose, start in Phalakasana and with an exhale slowing bend your elbows to lower down while trying to keep your elbows tracking directly behind your shoulders (resist the tendency for your shoulders to splay out or squeeze in)
  • Consider lowering with your knees on the floor as you develop the strength in your arms, shoulders, upper back and core to lower with ease and stability.
  • Lower to where your shoulders are just level with your elbows, shoulder blades drawing down your back, over time wrists aligned under your elbows.
  • Keep your legs engaged, pelvis neutral, belly lightly engaged, sternum extending forward, back of your neck long.
10. Urdhva Mukha Svanasana (Upward-Facing Dog)


  • Urdhva Mukha Svanasana is an intense and powerful awakening backbending asana.
  • Always consider the option of Salabasana B or “Easy Cobra” as an alternative in the following conditions: low back pain or insufficient arm, shoulder or leg strength to suspend their body on the hands and feet.
  • Urdhva Mukha Svanasana is “set up” with proper alignment in Chataranga Dandasana.
  • In first learning the asana, it is helpful to first learn Salabasana and/or Bhujangasana.
  • Emphasize active legs. Along with alignment principles, this is the key to reducing the risk of low back strain on this asana.
  • Press the tops of your feet firmly down and create a sense of extending your toes straight back.
  • In rooting the feet down, the legs can become more active. Try to rotate your inner thighs up, thereby creating space in the SI joint and greater ease in drawing the tailbone toward the heels.
  • Most students tend to squeeze their buttocks in this pose, which has the effect of externally rotating the thighs and compressing the low back. Let go of your buttocks!
  • Rooting firmly into the knuckles of the index fingers helps to ensure balanced pressure across the hands and wrist joints, thereby reducing the likelihood of strain in the wrists. Strong and balanced rooting of the hands also leads to greater extension of the arms and lifting and spreading of the chest, which is essential in creating the length in the spine required for deepening the backbend.
  • Try to consciously draw the curve of the backbend up your spine and create a sense of pulling the lower tips of your shoulder blades down and forward as if into your heart center while spreading your collarbones.
  • Students with weak shoulders (specifically rhomboids, traps and serratus anterior muscles) will tend to hang in their shoulders, which tends to strain the neck, close the heart center, compromise the breath and exacerbate the tendency to dump into the low back. Encourage these students to more actively press into their hands (wrists allowing) in order to better activate the drawing of the shoulders down away from the ears, pulling their shoulder blades down and spreading their side ribs forward.
11. Adho Muckha Svanasana (Downward-Facing Dog)


  • Adho Mukha Svasanasa is a powerful, timeless teacher. It actively involves nearly every part of the body.
  • It stretches the fingers, wrists, arms, shoulders, back, side, chest, hips, legs, ankles and feet.
  • It strengthens most of the same parts of the body as well as the abdominals when one is cultivating ujjayi pranayama, mula bandha and uddiyana bandha.
  • Press firmly into the entire span of your hands and length of your fingers, paying close attention to rooting the knuckle of the index finger as a way of balancing pressure in the wrist joint.
  • Generally, the middle fingers should be parallel and in line with the shoulders. Look at see if your arms are parallel; this will indicate if your hands are in line with your shoulders.
  • The alignment of the wrists with the shoulders allows the proper external rotation of the shoulders.
  • Tight shoulders – especially limited shoulder flexion due to tight latisimus dorsi, pectoralis major and rhomboid muscles – and weak shoulders create specific risks to the neck, back, elbows, wrists and shoulders themselves. In either case, moderate effort in this asana develops both strength and flexibility, opening the shoulders to full flexion while developing deeper, more balanced strength.
  • The shoulder blades should be rooted again the back ribs while externally rotating the shoulder joint, spreading the trapezius.
  • Feet should be placed hip distance apart or wider with the outer edges of the feet parallel.
  • Students with tight hips and hamstrings will find it difficult, painful and/or impossible to straighten their legs in this asana. Explore separating the feet wider apart and keeping your knees bent while moving into deepening your flexibility.
  • Rooting into the balls of the feet will contribute to the lifting of the inner arches. This in turn helps to engage mula bandha (by activating the pereneus longus and tibialis posterior, which through fascial attachments help activates the hip adductors and pelvic floor muscles).
  • Firming the thighs and pressing the top of the femur bones strongly back is a key action (along with rooted hands) in lengthening the spine in this asana. Resist any tendency to hyperextend your knees.
  • With practice, the neck will become sufficiently strong and supple to keep the head between the upper arms. Until that strength and ease is developed, let your neck relax and head hang down.
  • The first few times in the asana in any given practice, it can feel good and help the body in gently opening to “bicycle” the legs, dipping alternately into each hip and stretching long through the sides of the body while exploring the hamstrings, low back, shoulders, ankles and feet.
12. Lunge Up
13. Chaturanga Dandasana (Four-Limbed Staff Pose)


  • In first learning this pose, start in Phalakasana and with an exhale slowing bend your elbows to lower down while trying to keep your elbows tracking directly behind your shoulders (resist the tendency for your shoulders to splay out or squeeze in)
  • Consider lowering with your knees on the floor as you develop the strength in your arms, shoulders, upper back and core to lower with ease and stability.
  • Lower to where your shoulders are just level with your elbows, shoulder blades drawing down your back, over time wrists aligned under your elbows.
  • Keep your legs engaged, pelvis neutral, belly lightly engaged, sternum extending forward, back of your neck long.
14. Urdhva Mukha Svanasana (Upward-Facing Dog)


  • Urdhva Mukha Svanasana is an intense and powerful awakening backbending asana.
  • Always consider the option of Salabasana B or “Easy Cobra” as an alternative in the following conditions: low back pain or insufficient arm, shoulder or leg strength to suspend their body on the hands and feet.
  • Urdhva Mukha Svanasana is “set up” with proper alignment in Chataranga Dandasana.
  • In first learning the asana, it is helpful to first learn Salabasana and/or Bhujangasana.
  • Emphasize active legs. Along with alignment principles, this is the key to reducing the risk of low back strain on this asana.
  • Press the tops of your feet firmly down and create a sense of extending your toes straight back.
  • In rooting the feet down, the legs can become more active. Try to rotate your inner thighs up, thereby creating space in the SI joint and greater ease in drawing the tailbone toward the heels.
  • Most students tend to squeeze their buttocks in this pose, which has the effect of externally rotating the thighs and compressing the low back. Let go of your buttocks!
  • Rooting firmly into the knuckles of the index fingers helps to ensure balanced pressure across the hands and wrist joints, thereby reducing the likelihood of strain in the wrists. Strong and balanced rooting of the hands also leads to greater extension of the arms and lifting and spreading of the chest, which is essential in creating the length in the spine required for deepening the backbend.
  • Try to consciously draw the curve of the backbend up your spine and create a sense of pulling the lower tips of your shoulder blades down and forward as if into your heart center while spreading your collarbones.
  • Students with weak shoulders (specifically rhomboids, traps and serratus anterior muscles) will tend to hang in their shoulders, which tends to strain the neck, close the heart center, compromise the breath and exacerbate the tendency to dump into the low back. Encourage these students to more actively press into their hands (wrists allowing) in order to better activate the drawing of the shoulders down away from the ears, pulling their shoulder blades down and spreading their side ribs forward.
15. Adho Muckha Svanasana (Downward-Facing Dog)


  • Adho Mukha Svasanasa is a powerful, timeless teacher. It actively involves nearly every part of the body.
  • It stretches the fingers, wrists, arms, shoulders, back, side, chest, hips, legs, ankles and feet.
  • It strengthens most of the same parts of the body as well as the abdominals when one is cultivating ujjayi pranayama, mula bandha and uddiyana bandha.
  • Press firmly into the entire span of your hands and length of your fingers, paying close attention to rooting the knuckle of the index finger as a way of balancing pressure in the wrist joint.
  • Generally, the middle fingers should be parallel and in line with the shoulders. Look at see if your arms are parallel; this will indicate if your hands are in line with your shoulders.
  • The alignment of the wrists with the shoulders allows the proper external rotation of the shoulders.
  • Tight shoulders – especially limited shoulder flexion due to tight latisimus dorsi, pectoralis major and rhomboid muscles – and weak shoulders create specific risks to the neck, back, elbows, wrists and shoulders themselves. In either case, moderate effort in this asana develops both strength and flexibility, opening the shoulders to full flexion while developing deeper, more balanced strength.
  • The shoulder blades should be rooted again the back ribs while externally rotating the shoulder joint, spreading the trapezius.
  • Feet should be placed hip distance apart or wider with the outer edges of the feet parallel.
  • Students with tight hips and hamstrings will find it difficult, painful and/or impossible to straighten their legs in this asana. Explore separating the feet wider apart and keeping your knees bent while moving into deepening your flexibility.
  • Rooting into the balls of the feet will contribute to the lifting of the inner arches. This in turn helps to engage mula bandha (by activating the pereneus longus and tibialis posterior, which through fascial attachments help activates the hip adductors and pelvic floor muscles).
  • Firming the thighs and pressing the top of the femur bones strongly back is a key action (along with rooted hands) in lengthening the spine in this asana. Resist any tendency to hyperextend your knees.
  • With practice, the neck will become sufficiently strong and supple to keep the head between the upper arms. Until that strength and ease is developed, let your neck relax and head hang down.
  • The first few times in the asana in any given practice, it can feel good and help the body in gently opening to “bicycle” the legs, dipping alternately into each hip and stretching long through the sides of the body while exploring the hamstrings, low back, shoulders, ankles and feet.
16. Ardha Uttanasana (Forward Bend)


  • From Uttanasana,   inhaling extend your chest forward toward the horizon, maximizing the length of your spine and sense of extending your heart center toward the horizon.
  • It’s okay to keep your knees bent while working toward keeping your legs straight and strong.
  • You can also place your hands on your shins or come high onto your fingertips as in the picture while working toward maximum extension with your palms still rooted onto the floor as in Uttanasana.
17. Uttanasana (Standing Forward Bend)


  • rom Urdhva Hastasana, exhaling slowing swan dive forward and down with a long spine and flat back, extending from your public bone through your sternum while your legs either straight and strong or bent to relieve strain on your hamstrings and low back.
  • Try to maintain “Tadasana legs” throughout this movement.
  • When doing this asana as part of a Sun Salutation, complete your exhale in Uttanasana and begin the next movement on your inhale.
18. Squat
19. Urdhva Hastasana (Upward Salute)


  • With your arms down at your sides in Tadasana, try to maintain all the qualities of Tadasana as you turn your palms out and with an inhale slowly sweep your arms out and up overhead.
  • With your shoulder blades rooting down and in against your back ribs, reach strongly through your arms and fingertips.
  • Try to eventually bring your palms together and gaze up to your thumb
20. Tadasana (Mountain Pose)


  • Standing with your feet together at the front of your mat, lift and spread your toes while rooting firmly into the inner edges of the balls of your feet, feeling with this action the balanced lifting of your inner arches, or “Pada Bandha.”
  • Maintaining Pada Bandha while firmly rooting your feet in the Earth, feel the rebounding effect of the musculauture in your legs gathering in and up.
  • Firming your thighs and lightly spiraling your inner upper thighs back, explore placing your hands on the top of your hips to find a feeling of pelvic neutrality – hips level, spine growing naturally out of your pelvis.
  • Breathing smoothly and steadily, with each inhale keep rooting your feet and engaging your thigh muscles while growing taller through your spine, expanding across your heart center and extending energetically out the crown of your head.
  • With relaxed engagement, try to maintain that extension and spaciousness as you slowly exhale, feeling a sense of renewed stability and ease as your breath flows out.

surya-namaskara

Surya Namaskara B (Sun Salutation B)

Surya Namaskara A (Sun Salutation A)

Surya Namaskara C (Classical Sun Salutation)

Yoga Teacher Training

Request More YTT Information
Yoga Teacher Certification Programs
Continuing Education
Teacher Training Applications
Teacher Training Testimonials

Yoga in Santa Cruz

Workshop and Teacher Training Calendar
About Santa Cruz

Library & Resources

Books for Yoga Teachers
Blog & Writings on Yoga
Instructional Yoga Videos
Yoga Audio
Yoga Posture Slideshows

Sharing & Connecting

 Facebook
 YouTube
 Pinterest
 Twitter
 LinkedIn


  • Contact Us
  • About Mark
  • Site Map
  • Gratitude
Copyright © 2017 Mark Stephens Yoga. Call 888-594-YOGA(9642)